Sunday 28 September 2014

DDF XML - Version 4.0

DDF 3.x version has only support for TestNG, with the DDF 4.0 version you can use DataDrivenFramework with out using TestNG API.

Current implementation of DataDrivenFramework can be integrated with any automation tool/api which supports java (ex: Java Webdriver, Openscript, etc). It can also be used as part of application development for reading the data from XML file.

For information on other DDF versions click link DataDrivenFramework.

1. Prerequisite:
     i. Java 1.6
     ii. Eclipse IDE or any other Java IDE (ex: NetBeans IDE)

2. Download the  "DDF Version - 4.0.zip" from repository.
3. Extract the "DDF Version - 4.0.zip" (zip file contains example programs and jar file).
4. Set "AH-DDF-4.0.jar" in java build path.

Note:
'AH-DDF-<<Version>>.jar' is proprietary jar file, distributed for free.

Java Build Path:

Test Data:

Sample Program:
package examples.Non_TestNG_test.xml;

import java.io.File;
import java.util.List;
import java.util.Map;

import automation_home.ddf.constants.XMLConstants;
import automation_home.ddf.wrapper.Wrapper;
import automation_home.ddf.wrapperimpl.XMLWrapper;

public class TestData {

/**
* @param args
* @throws Exception
*/
public static void main(String[] args) throws Exception {
for(Map<String, String> h : configure()){
 System.out.println("FlightName : "+h.get("FlightName"));
 System.out.println("FlightNumber : "+h.get("FlightNumber"));
 System.out.println("AirPort : "+h.get("AirPort"));
 System.out.println("Date : "+h.get("Date"));
 System.out.println("----------------------------------------");
 }
}

public static List<Map<String, String>> configure() throws Exception{
Wrapper wrapper = new XMLWrapper();

wrapper.setParameter(XMLConstants.FILE_PATH, new File("").getAbsolutePath()+"\\src\\examples\\Non_TestNG_test\\xml\\FlightInfo.xml");
wrapper.setParameter(XMLConstants.NODE_NAME, "flight-details");

 wrapper.setParameter(XMLConstants.INCLUDE_TESTDATA_HEADER_NAME, "TestInclude");
 wrapper.setParameter(XMLConstants.INCLUDE_TESTDATA_YES,"true");
 wrapper.setParameter(XMLConstants.INCLUDE_TESTDATA_NO,"false");

 List<Map<String, String>> list =  wrapper.retrieveData();
 return list;
}
}

Output:

Watch Demo

<< Previous

DDF CSV - Version 4.0

DDF 3.x version has only support for TestNG, with the DDF 4.0 version you can use DataDrivenFramework with out using TestNG API.

Current implementation of DataDrivenFramework can be integrated with any automation tool/api which supports java (ex: Java Webdriver, Openscript, etc). It can also be used as part of application development for reading the data from CSV file.

For information on other DDF versions click link DataDrivenFramework.

1. Prerequisite:
     i. Java 1.6
     ii. Eclipse IDE or any other Java IDE (ex: NetBeans IDE)

2. Download the  "DDF Version - 4.0.zip" from repository.
3. Extract the "DDF Version - 4.0.zip" (zip file contains example programs and jar file).
4. Set "AH-DDF-4.0.jar" in java build path.

Note:
'AH-DDF-<<Version>>.jar' is proprietary jar file, distributed for free.

Java Build Path:

Test Data:

Sample Program:
package examples.Non_TestNG_test.csv;

import java.io.File;
import java.util.List;
import java.util.Map;

import automation_home.ddf.wrapper.Wrapper;
import automation_home.ddf.constants.CsvConstants;
import automation_home.ddf.wrapperimpl.CsvWrapper;

public class TestData {

/**
* @param args
* @throws Exception
*/
public static void main(String[] args) throws Exception {
for (Map<String, String> h : configure()) {
System.out.println("FlightName : " + h.get("FlightName"));
System.out.println("FlightNumber : " + h.get("FlightNumber"));
System.out.println("AirPort : " + h.get("AirPort"));
System.out.println("Date : " + h.get("Date"));
System.out.println("----------------------------------------");
}
}

public static List<Map<String, String>> configure() throws Exception {
Wrapper wrapper = new CsvWrapper();

wrapper.setParameter(CsvConstants.FILE_PATH,
new File("").getAbsolutePath()
+ "\\src\\examples\\Non_TestNG_test\\csv\\TestData.csv");

wrapper.setParameter(CsvConstants.INCLUDE_TESTDATA_HEADER_NAME,
"includeTestData");
wrapper.setParameter(CsvConstants.INCLUDE_TESTDATA_YES, "TRUE");
wrapper.setParameter(CsvConstants.INCLUDE_TESTDATA_NO, "FALSE");

List<Map<String, String>> list = wrapper.retrieveData();
return list;
}
}

Output:

Watch Demo

<< Previous

DDF Workbook- Version 4.0

DDF 3.x version has only support for TestNG, with the DDF 4.0 version you can use DataDrivenFramework with out using TestNG API.

Current implementation of DataDrivenFramework can be integrated with any automation tool/api which supports java (ex: Java Webdriver, Openscript, etc). It can also be used as part of application development for reading the data from Excel file.

For information on other DDF versions click link DataDrivenFramework.

1. Prerequisite:
     i. Java 1.6
     ii. Eclipse IDE or any other Java IDE (ex: NetBeans IDE)
     iii. Set POI API jar files in java build path.

     Download Apache POI, follow below process
     1. Goto url: http://poi.apache.org/
     2. Click on "download" link (i.e. http://poi.apache.org/download.html page opens)
     3. Click on "poi-bin-<<version>>.zip" link
     4. Select the mirror and download the "poi-<<version>>.zip"
     5. Extract the downloaded "poi-<<version>>.zip" file, next step is to set the java build path.

     Files required in java build path.
     1. poi-<<version>>.jar
     2. poi-ooxml-<<version>>.jar
     3. poi-ooxml-schemas-<<version>>.jar

     Open the "ooxml-lib" folder present in the extracted "poi-<<version>>.zip" file, set the below jar files in java build path.
     4. dom4j-<<version>>.jar
     5. xmlbeans-<<version>>.jar

     6. Download the  "DDF Version - 4.0.zip" from repository.
     7. Extract the "DDF Version - 4.0.zip" (zip file contains example programs and jar file).
     8. Set "AH-DDF-4.0.jar" in java build path.

Note:
'AH-DDF-<<Version>>.jar' is proprietary jar file, distributed for free.

Java Build Path:


Test Data:

Sample Program:
package examples.Non_TestNG_test.xml;

import java.io.File;
import java.util.List;
import java.util.Map;

import automation_home.ddf.constants.XMLConstants;
import automation_home.ddf.wrapper.Wrapper;
import automation_home.ddf.wrapperimpl.XMLWrapper;

public class TestData {

/**
* @param args
* @throws Exception
*/
public static void main(String[] args) throws Exception {
for(Map<String, String> h : configure()){
 System.out.println("FlightName : "+h.get("FlightName"));
 System.out.println("FlightNumber : "+h.get("FlightNumber"));
 System.out.println("AirPort : "+h.get("AirPort"));
 System.out.println("Date : "+h.get("Date"));
 System.out.println("----------------------------------------");
 }
}

public static List<Map<String, String>> configure() throws Exception{
Wrapper wrapper = new XMLWrapper();

wrapper.setParameter(XMLConstants.FILE_PATH, new File("").getAbsolutePath()+"\\src\\examples\\Non_TestNG_test\\xml\\FlightInfo.xml");
wrapper.setParameter(XMLConstants.NODE_NAME, "flight-details");

 wrapper.setParameter(XMLConstants.INCLUDE_TESTDATA_HEADER_NAME, "TestInclude");
 wrapper.setParameter(XMLConstants.INCLUDE_TESTDATA_YES,"true");
 wrapper.setParameter(XMLConstants.INCLUDE_TESTDATA_NO,"false");

 List<Map<String, String>> list =  wrapper.retrieveData();
 return list;
}
}

Output:

Watch Demo

<< Previous

How to handle Autocomplete in Java-Webdriver

Below partial text of definition is copied from Wikipedia http://en.wikipedia.org/wiki/Autocomplete
 
Definition: Autocomplete involves the program predicting a word or phrase that the user wants to type in without the user actually typing it in completely. This feature is effective when it is easy to predict the word being typed based on those already typed, such as when there are a limited number of possible or commonly used words

Below is the sample program to demonstrate 'google search' autocomplete feature.

Program:

package wd;

import java.util.List;
import org.openqa.selenium.By;
import org.openqa.selenium.Keys;
import org.openqa.selenium.WebDriver;
import org.openqa.selenium.WebElement;
import org.openqa.selenium.firefox.FirefoxDriver;

public class WDAutoCompleTest {

    static WebDriver driver = null;
    static String URL = "http://www.google.com/";
    static String SEARCH_FOR = "java webdriver api";
    static String TYPE_SEARCH_TEXT = "java webdrii";
    public static void main(String[] args) throws Exception {
        //Launch the browser with the URL provided.
        launchURL();
       
        //Enter the searchText.
        WebElement webElement = driver.findElement(By.id("gbqfq"));
        webElement.sendKeys(TYPE_SEARCH_TEXT);
        webElement.sendKeys(Keys.BACK_SPACE);
        Thread.sleep(1000);
       
        List<WebElement> list = driver.findElements(By.xpath("//div[@class='sbsb_a']/ul/li"));
        int i=1;
        for(WebElement webElementLiList : list){
            if(!(i<=list.size())) break;
            WebElement webElementLi = webElementLiList.findElement(By.xpath("//div[@class='sbsb_a']/ul/li["+i+"]/div/div[2]"));
            String text = webElementLi.getText();
            if(text.equalsIgnoreCase(SEARCH_FOR)){
                System.out.println("Search String :: "+text);
                webElementLi.click();
                break;
            }
           
            i++;
        }
       
        //Close the browser & webdriver
        quitDriver();
    }
   
    public static void launchURL() throws InterruptedException{
        driver = new FirefoxDriver();
        driver.manage().window().maximize();
        driver.get(URL);
        Thread.sleep(1000);
    }
   
    public static void quitDriver() throws InterruptedException{
        Thread.sleep(5000);
        driver.close();
        driver.quit();
    }

}

Output:


Wednesday 17 September 2014

Wednesday 10 September 2014

Automating Calculator application using Java and Sikuli.


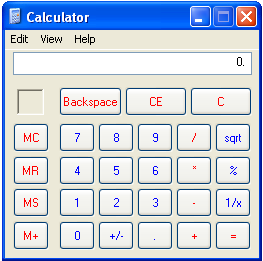
Below program demonstrates automating calculator application using Java & Sikuli.

Prerequisites:
1. Java 1.6 or higher version installed.
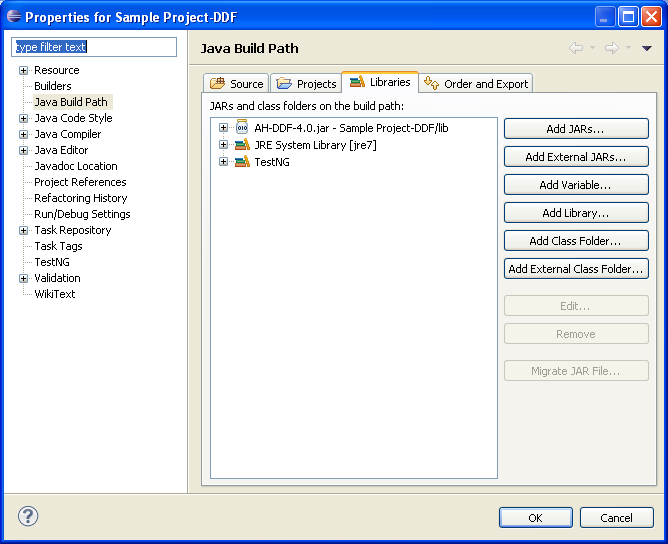
2. Sikulli installed, click link for Sikuli Installation.
    For simple java program using Sikuli click here.


Capture all buttons of Calculator:

Set build path for Sikuli:

Executing script:

Download the source code from repository.

Program for automating calculator application:
import java.awt.Toolkit;
import java.awt.datatransfer.Clipboard;
import java.awt.datatransfer.DataFlavor;
import java.awt.datatransfer.Transferable;
import java.awt.datatransfer.UnsupportedFlavorException;
import java.io.IOException;
import java.util.ArrayList;
import java.util.HashMap;
import java.util.List;
import java.util.Map;

import org.sikuli.basics.Settings;
import org.sikuli.script.App;
import org.sikuli.script.FindFailed;
import org.sikuli.script.Key;
import org.sikuli.script.Screen;

/** Automating Calculator Application.
 *
 * @author http://automation-home.blogspot.in/
 */
public class CalcTest {
Runtime rs = null;
Screen screen = null;
static CalcTest ct = null;
Map<String, String> calcButtonMap = null;
final String APPLICATION = "calc.exe";

/** Initialization block
*
*/
{
calcButtonMap = new HashMap<String, String>();

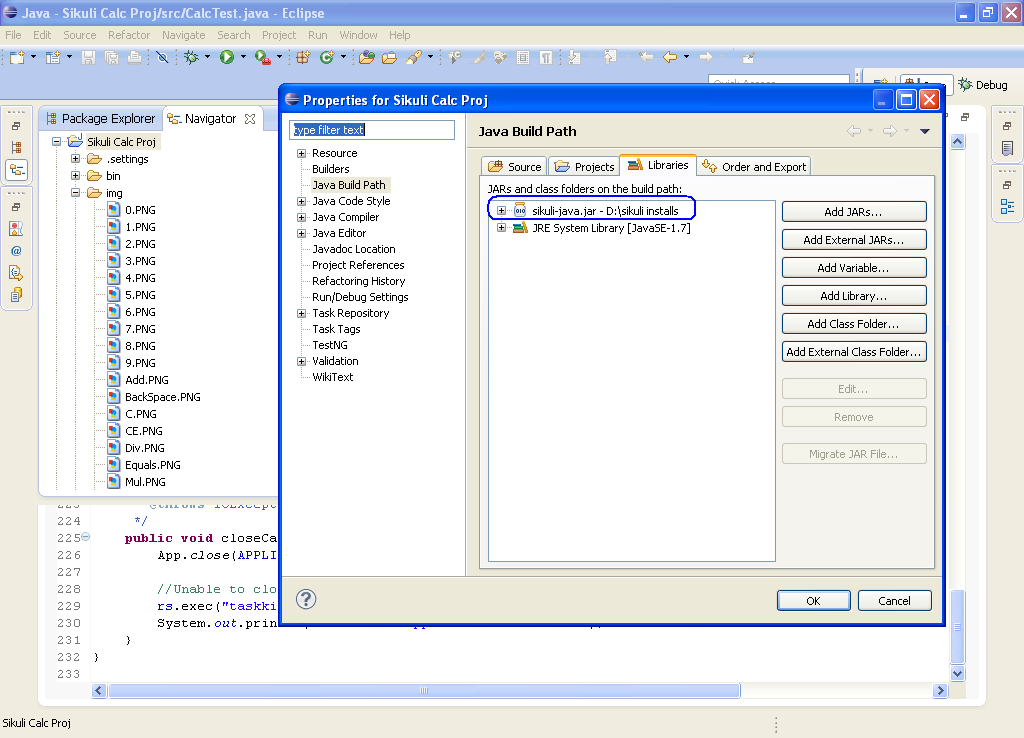
String imagePath = "\\img\\";

calcButtonMap.put("0", imagePath + "0.PNG");
calcButtonMap.put("1", imagePath + "1.PNG");
calcButtonMap.put("2", imagePath + "2.PNG");
calcButtonMap.put("3", imagePath + "3.PNG");
calcButtonMap.put("4", imagePath + "4.PNG");
calcButtonMap.put("5", imagePath + "5.PNG");
calcButtonMap.put("6", imagePath + "6.PNG");
calcButtonMap.put("7", imagePath + "7.PNG");
calcButtonMap.put("8", imagePath + "8.PNG");
calcButtonMap.put("9", imagePath + "9.PNG");

//Operators
calcButtonMap.put("Add", imagePath + "Add.PNG");
calcButtonMap.put("Mul", imagePath + "Mul.PNG");
calcButtonMap.put("Div", imagePath + "Div.PNG");
calcButtonMap.put("Sub", imagePath + "Sub.PNG");

calcButtonMap.put("C", imagePath + "C.PNG");
calcButtonMap.put("Equals", imagePath + "Equals.PNG");
}

/** main method.
*
* @param args
* @throws IOException
* @throws InterruptedException
* @throws FindFailed
* @throws UnsupportedFlavorException
*/
public static void main(String[] args) throws IOException, InterruptedException, FindFailed, UnsupportedFlavorException {
 
ct = new CalcTest();

Settings.ClickDelay = 20;

//disabling the sikuli logs.
Settings.ActionLogs=false;

ct.screen = new Screen();
ct.rs = Runtime.getRuntime();

ct.launchCalculator();
ct.calculate();
ct.closeCalculator();
}

/** Perform's calculations and validates the results.
*
* @throws NumberFormatException
* @throws FindFailed
* @throws InterruptedException
* @throws UnsupportedFlavorException
* @throws IOException
*/
public void calculate() throws NumberFormatException, FindFailed, InterruptedException, UnsupportedFlavorException, IOException{
int results = 0;

// 4 + 5 =9
List<String> calcListAdd = new ArrayList<String>();
calcListAdd.add("4");
calcListAdd.add("Add");
calcListAdd.add("5");
calcListAdd.add("Equals");
results =Integer.parseInt(performOperation(calcListAdd));
if(results == 9){
System.out.println("Results Sucess: 4 + 5 = "+results);
}else{
System.out.println("Results Failed: 4 + 5 = "+results);
}

// 8 * 2 =16
List<String> calcListMul = new ArrayList<String>();
calcListMul.add("8");
calcListMul.add("Mul");
calcListMul.add("2");
calcListMul.add("Equals");
results = Integer.parseInt(performOperation(calcListMul));
if(results == 16){
System.out.println("Results Sucess: 8 * 2 = "+results);
}else{
System.out.println("Results Failed: 8 * 2 = "+results);
}

// 71 - 11 = 60
List<String> calcListSub = new ArrayList<String>();
calcListSub.add("7");
calcListSub.add("1");
calcListSub.add("Sub");
calcListSub.add("1");
calcListSub.add("Equals");
results = Integer.parseInt(performOperation(calcListSub));
if(results == 60){
System.out.println("Results Sucess: 71 - 1 = "+results);
}else{
System.out.println("Results Failed: 71 - 1 = "+results);
}

// 18 / 2 = 9
List<String> calcListDiv = new ArrayList<String>();
calcListDiv.add("1");
calcListDiv.add("8");
calcListDiv.add("Div");
calcListDiv.add("2");
calcListDiv.add("Equals");
results = Integer.parseInt(performOperation(calcListDiv));
if(results == 9){
System.out.println("Results Sucess: 18 / 2 = "+results);
}else{
System.out.println("Results Failed: 18 / 2 = "+results);
}

// 4 + 5 + 1 + 10 = 20
List<String> calcListAddMoreNums = new ArrayList<String>();
calcListAddMoreNums.add("4");
calcListAddMoreNums.add("Add");
calcListAddMoreNums.add("5");
calcListAddMoreNums.add("Add");
calcListAddMoreNums.add("1");
calcListAddMoreNums.add("Add");
calcListAddMoreNums.add("1");
calcListAddMoreNums.add("0");
calcListAddMoreNums.add("Equals");
results = Integer.parseInt(performOperation(calcListAddMoreNums));
if(results == 20){
System.out.println("Results Sucess: 4 + 5 + 1 + 10 = "+results);
}else{
System.out.println("Results Failed: 4 + 5 + 1 + 10 = "+results);
}
}

/** Perform operations on calculator application.
*
* @param calcList
* @return ct.getResults() as String
* @throws FindFailed
* @throws InterruptedException
* @throws UnsupportedFlavorException
* @throws IOException
*/
public String performOperation(List<String> calcList) throws FindFailed, InterruptedException, UnsupportedFlavorException, IOException{
screen.click(calcButtonMap.get("C"));
Thread.sleep(100);

for(String calElement : calcList){
screen.click(calcButtonMap.get(calElement));
}

return ct.getResults();
}

/** Fetch the results after the operations are done.
*
* @return results as String
* @throws FindFailed
* @throws UnsupportedFlavorException
* @throws IOException
* @throws InterruptedException
*/
public String getResults() throws FindFailed, UnsupportedFlavorException, IOException, InterruptedException{
Thread.sleep(100);
screen.click("\\img\\ResultPanel.PNG");
screen.type("c",Key.CTRL);

Clipboard clipboard = Toolkit.getDefaultToolkit().getSystemClipboard();
Transferable contents = clipboard.getContents(DataFlavor.stringFlavor);
String results = (String) contents.getTransferData(DataFlavor.stringFlavor);

System.out.println("results >> "+results);
return results;
}

/** Launch the calculator application.
*
* @throws IOException
* @throws InterruptedException
*/
public void launchCalculator() throws IOException, InterruptedException{
closeCalculator();
Thread.sleep(500);
App.open(APPLICATION);
Thread.sleep(500);
}

/** Quit the calculator application.
*
* @throws IOException
*/
public void closeCalculator() throws IOException{
App.close(APPLICATION);

//Unable to close the calculator application using "App.close("calc.exe")"
rs.exec("taskkill /F /IM "+APPLICATION);
System.out.println("Calculator Application is closed.");
}
}

Watch Demo


Note:
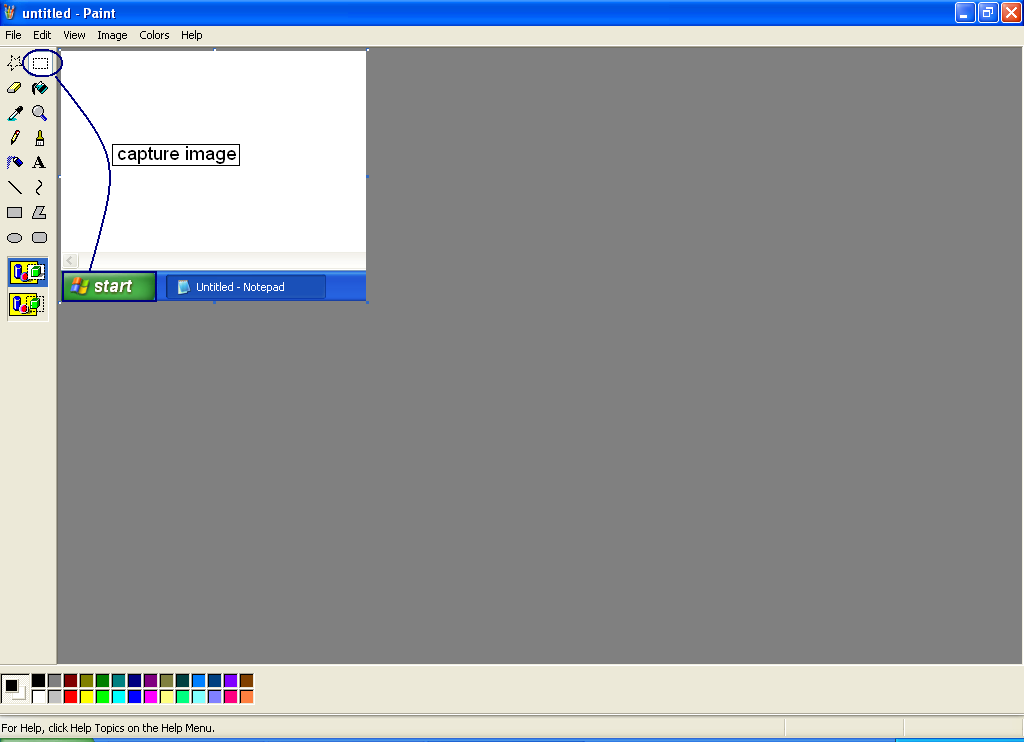
Since Sikuli works on the concept of comparing the image supplied to the program with the Desktop Screen

Above program works with only Windows XP calculator application
Ex: Calculator application User Interface changes from Windows XP to Windows 7.

If you want to run the above program/script in other operating systems, then you need re-capture the calculator images and place them in the "img"(i.e. images folder) with the already existing file names(i.e overwriting the images). .

Extending above script:
Above program can be integrated with TestNG and DataDrivenFramework.

Pros of Sikuli:
1. Sikuli work's with both browser based and non-browser based applications.
2. While automating the web based applications(i.e. using browser), operations which are not supported by Webdriver API can be performed by the Sikuli API.
3. Sikuli can be integrated with the webdriver API(i.e. Automation Framework with Webdriver & Sikuli API)

Cons of Sikuli:
1. As Sikuli works on the concept of image recolonization(i.e. Sikuli click's on the screen based on the input image supplied to the program), if the User Interface components of the application are updated or changed then you need to re-capture the images.
Ex: Calculator buttons color is changed from white to grey color.

2. While the script(i.e. script developed using Sikuli API) is executing, user should not take the control of keyboard or mouse (i.e. similar to that for java.awt.robot API)

3. When the script(i.e. developed using Sikuli API) is executing system should not be locked.

4. Before executing the script(i.e. developed using Sikuli API) make sure that no other applications/folder's are present(i.e. maximized), close all other application and folders (or) minimize them.
Ex: Before executing the script for calculator application, if folder is maximized containing all the calculator images. While script is executing Sikul click's few calculator application buttons and  clicks other images in the maximized folder(since the folder contains the calculator application images). 

Related Links

Java and AutoIt - Automating the calculator application using autoitx4java
http://automation-home.blogspot.in/2015/06/java-and-autoit-automating-calculator-application.html

Java and Twin Automation Tool - Automating windows calculator application.
http://automation-home.blogspot.in/2015/12/java-twin-automation-tool-automate-windows-calc-application.html

Monday 8 September 2014

Executing Sample Program using Sikuli.

Click link for Sikuli Installation.

Below program demonstrates, click Window XP Start button using Java and Sikuli

To click the Window XP start button, first its required to capture the "Start" button image and this can be done by two way's.

Option 1: Capturing "Start" button image using Sikuli IDE.
Option 2: Capturing "Start" button image using keyboard "Print Screen" button and crop the image(i.e. removing the unwanted portion of the image).

The current page illustrates capturing image using option 2.


Crop the image and save.


After the image is cropped and saved(i.e. "Start1.PNG").

Sikuli Installation folder:

Set the Build path for Sikuli jar.


Sample Program:
package pack1;
import org.sikuli.script.Screen;

public class SilkuliExample1 {
public static void main(String[] args) {
Screen s = new Screen();
try {
s.click("D:\\Eclipse Workspace\\Sikuli Proj\\img\\Start1.PNG");
Thread.sleep(5000);
} catch (Exception e) {
e.printStackTrace();
}
}
}


When program is executed, Sikuli click's the Windows XP Start button.


Sikuli Troubleshooting:
        Issue with the below program is captured image is not proper(i.e. Sikuli unable to match the image provided in the program with the screen), in that case it is required to recapture the image and pass it to the program. 

Cropped image("Start.png"):

Sample Program:
package pack1;

import org.sikuli.script.Screen;

public class SilkuliExample1 {

public static void main(String[] args) {
Screen s = new Screen();
try {
s.click("D:\\Eclipse Workspace\\Sikuli Proj\\img\\Start.PNG");
Thread.sleep(5000);
} catch (Exception e) {
e.printStackTrace();
}
}
}

Output:

FindFailed: can not find D:\Eclipse Workspace\Sikuli Proj\img\Start.PNG on the screen.
  Line 1574, in file Region.java

at org.sikuli.script.Region.handleFindFailed(Region.java:1574)
at org.sikuli.script.Region.wait(Region.java:1682)
at org.sikuli.script.Region.find(Region.java:1590)
at org.sikuli.script.Region.getLocationFromTarget(Region.java:1991)
at org.sikuli.script.Region.click(Region.java:2197)
at org.sikuli.script.Region.click(Region.java:2181)
at pack1.SilkuliExample1.main(SilkuliExample1.java:10)

Note: Above program is demonstrated using Windows XP environment and program doesn't work with other Windows Operating Systems, to execute above program on other operating systems(i.e. Windows 7, Windows Vista, etc) re-capture the image and add the image path in the program.