Sunday, 23 August 2015

C# Webdriver - Fetch the names of checkboxes which are selected using 'Select' and 'Where' in a single LINQ statement.


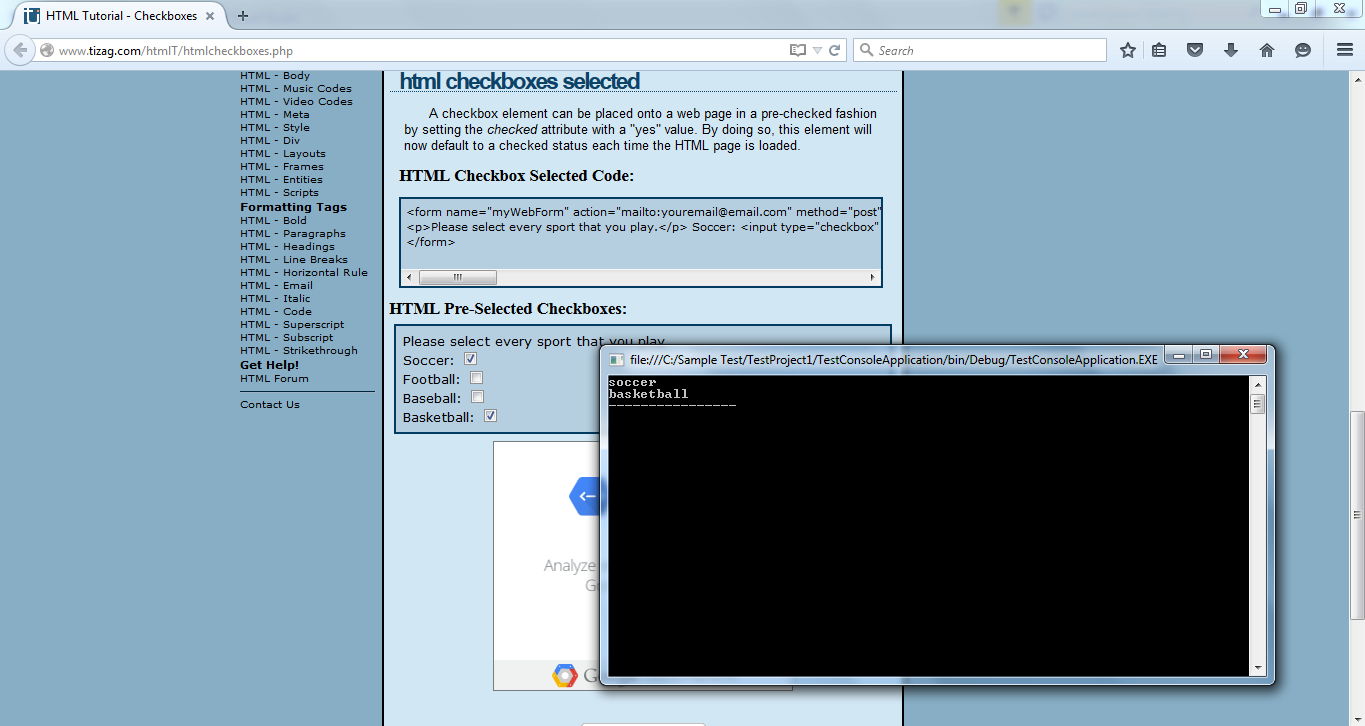
Fetch the names of checkboxes which are selected using 'Select' and 'Where'.
using System;
using OpenQA.Selenium.Firefox;
using OpenQA.Selenium;
using System.Threading;
using System.Linq;


namespace TestConsoleApplication
{
    class Program
    {
        static void Main(string[] args)  
        {
            IWebDriver driver = new FirefoxDriver();
            driver.Manage().Window.Maximize();
            driver.Navigate().GoToUrl("http://www.tizag.com/htmlT/htmlcheckboxes.php");
            Thread.Sleep(3000);

            string xpath = "html/body/table[3]/tbody/tr[1]/td[2]/table/tbody/tr/td/div[6]/input";
            var list = driver.FindElements(By.XPath(xpath)).Where(p => p.Selected==true).Select(x => x.GetAttribute("value"));

            foreach(var text in list){
                Console.WriteLine(text);
            }
             
            Console.WriteLine("----------------");
            Console.ReadLine();

            driver.Close();
            driver.Quit();
            driver.Dispose();
        }
 
    }
}

Fetch the names of checkboxes which are selected without using 'Select' and 'Where'.
using System;
using OpenQA.Selenium.Firefox;
using OpenQA.Selenium;
using System.Threading;

namespace TestConsoleApplication
{
    class Program1
    {
        static void Main(string[] args)
        {

            IWebDriver driver = new FirefoxDriver();
            driver.Manage().Window.Maximize();
            driver.Navigate().GoToUrl("http://www.tizag.com/htmlT/htmlcheckboxes.php");
            Thread.Sleep(2000);

            string xpath = "html/body/table[3]/tbody/tr[1]/td[2]/table/tbody/tr/td/div[6]/input";
            var webElements = driver.FindElements(By.XPath(xpath));

            foreach (var webElement in webElements)
            {
                if(webElement.Selected==true){
                    Console.WriteLine(webElement.GetAttribute("value"));
                }               
            }

            Console.WriteLine("---------------");
            Console.ReadLine();

            driver.Close();
            driver.Quit();
            driver.Dispose();
        }
    }
}


Saturday, 22 August 2015

C# Webdriver - Fetch all visible URL's using 'IEnumerable' Select method.

Fetch all visible URL's using 'IEnumerable' Select method.
using System;
using OpenQA.Selenium.Firefox;
using OpenQA.Selenium;
using System.Threading;
using System.Collections.Generic;
using System.Linq;

namespace TestConsoleApplication
{
    class Program
    {
        static void Main(string[] args) 
        {
            IWebDriver driver = new FirefoxDriver();
            driver.Manage().Window.Maximize();
            driver.Navigate().GoToUrl("http://www.google.com");

            driver.FindElement(By.CssSelector("#lst-ib")).SendKeys("Webdriver");
            driver.FindElement(By.CssSelector("#lst-ib")).SendKeys(Keys.Return);
            Thread.Sleep(2000);

            var list = driver.FindElements(By.CssSelector("._Rm")).Select(x => x.Text);

            foreach(var text in list){
                Console.WriteLine(text);
            }
             
            Console.WriteLine("------------------------------------");
            Console.ReadLine();

            driver.Close();
            driver.Quit();
            driver.Dispose();
        }
 
    }
}

Fetch all visible URL's without using 'IEnumerable' Select method.
using System;
using OpenQA.Selenium.Firefox;
using OpenQA.Selenium;
using System.Threading;

namespace TestConsoleApplication
{
    class Program1
    {
        static void Main(string[] args)
        {
            IWebDriver driver = new FirefoxDriver();
            driver.Manage().Window.Maximize();
            driver.Navigate().GoToUrl("http://www.google.com");

            driver.FindElement(By.CssSelector("#lst-ib")).SendKeys("Webdriver");
            driver.FindElement(By.CssSelector("#lst-ib")).SendKeys(Keys.Return);
            Thread.Sleep(2000);

            var webElements = driver.FindElements(By.CssSelector("._Rm"));

            foreach (var webElement in webElements)
            {
                Console.WriteLine(webElement.Text);
            }

            Console.WriteLine("------------------------------------");
            Console.ReadLine();

            driver.Close();
            driver.Quit();
            driver.Dispose();
        }
    }
}


Thursday, 13 August 2015

Firepath - Inspect element by css

Prerequisite:
Firebug addon is already installed in firefox browser.
Firepath addon is already installed.

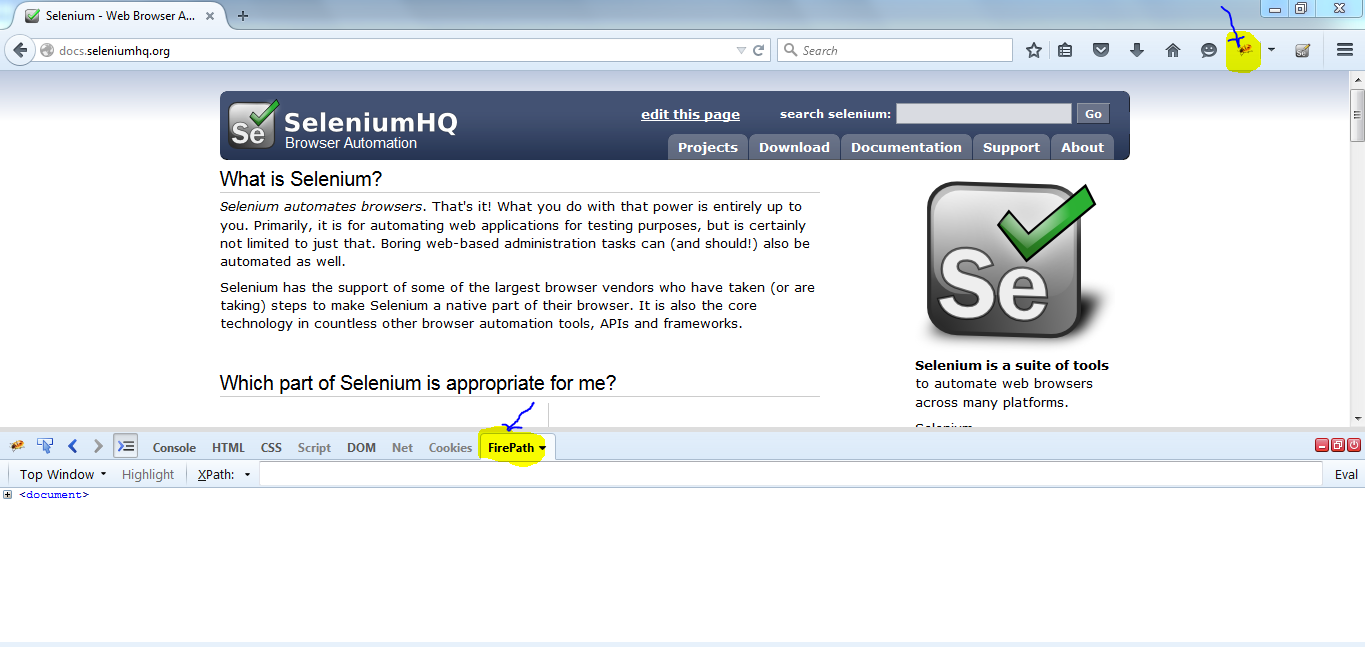
1. Navigate to the web page url,
    launch firebug addon..
2. Select 'css'

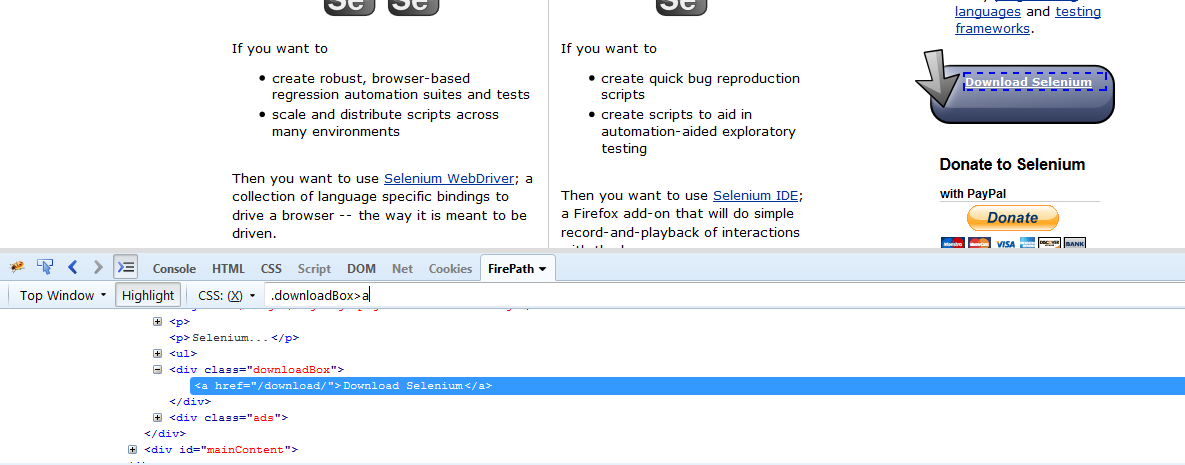
3. Click on the arrow icon to inspect the element,
    click the inspect icon(i.e. arrow icon) and move the mouse over the element to which you want to get the CSS locator. 


5. Re-verifying the css locator in selenium-ide (Prerequisite: Selenium IDE is already installed in firefox browser).
   launch the selenium-ide, stop the recording.
   copy the css locator and paste in selenium-ide.
   ex: .downloadBox>a

 Type 'css=' in target field.

6. click on 'Find' button in selenium-ide, element related to css locator is highlighted in the browser.

Note:
If the css locator is representing multiple elements in the browser.
Then css locator need to be modified, to uniquely identify identify the element.

Thursday, 30 July 2015

XPath to Css Conversion

Open the Firefox Browser with the URL.
Launch 'Firebug' addon in Firefox browser.

Click on 'Inspect Icon' in Firebug and move the mouse on to the web element for which you want to capture the Xpath.

Copy the XPath captured.
Ex: '//*[@id='rso']/div[2]/div[3]/div/h3/a'

Open the URL http://cssify.appspot.com/
Copy the XPath in the text field and click 'Submit' button.

Css locator is displayed for the XPath provided.

Note: 
- cssify will work only with the XPath
- cssify may not convert some of the XPath's
   ex: //div[@class='rc']/h3/a[text()='WebDriver']
- cssify with not work with converting XPath Axes
   ex: //div[@class='rc']/h3/a[text()='WebDriver']/parent::* 

Sunday, 14 June 2015

Node.js - Reverse of words in a string.

Prerequisites:
Node.js and NPM is already installed, click below link for installing Node.js and NPM.
http://automation-home.blogspot.in/2015/05/installing-nodejs-and-npm-on-windows.html

Procedure-1:
FileName: script1.js
var str = "Welcome to Automation-Home";
var result = "";
var wordArr = str.split(" ");
for(var i=wordArr.length-1; i>=0;i--){
   result = result+wordArr[i];
   if(i>0) result = result + " ";
}
console.log(result);

Procedure-2:
FileName: script2.js
var str = "Automation-Home welcomes you";
var result = str.split(" ").reverse().join(" ");
console.log(result);

Procedure-3:
FileName: script3.js
var rev = function(str){
  return str.split(" ").reverse().join(" ");
}
console.log(rev("NodeJS javascript"));

Watch Demo

Friday, 12 June 2015

Node.js - Reading data from JSON file or JSON object.

Prerequisites:
Node.js and NPM is already installed, click below link for installing Node.js and NPM.
http://automation-home.blogspot.in/2015/05/installing-nodejs-and-npm-on-windows.html

Below steps demonstrates reading the data from JSON file.
File Name: BooksInfo.json
[
  {
    "book_id" : "1125",
    "book_name" : "Head First Java",
  "book_cost" : "620"
  },
  {
    "book_id" : "8876",
    "book_name" : "Node.js in Action",
  "book_cost" : "2097"
  },
  {
    "book_id" : "5484",
    "book_name" : "Angular JS Testing Cookbook",
  "book_cost" : "1519"
    }
]

File Name: PrintJsonData.js
var fs = require('fs');
fs.readFile('BookInfo.json', 'utf8', function (err, data) {
  if (err) throw err;
  var jsonData = JSON.parse(data);
  console.log("--------------Books Information --------");
  for (var i = 0; i < jsonData.length; ++i) {
    console.log("Book Id"+jsonData[i].book_id);
    console.log("Book Name Id"+jsonData[i].book_name);
    console.log("Book Cost Id"+jsonData[i].book_cost);
  console.log("----------------------------------------");
  }
});


Open the command prompt.

Open the folder path in command prompt where the 'BooksInfo.json' and 'PrintJsonData.js' are placed.

Type the command 'node PrintJsonData.js' and press enter key.


Below steps demonstrates reading data from JSON object.
File Name: PrintJsonData.js
var response = '[{"Mobile":iOS , "Cost":55000}]';
var jsonObject = JSON.parse(response);
console.log(jsonObject[0].Mobile);
console.log(jsonObject[0].Cost);

Type the command 'node PrintJsonData.js' and press enter key.

--------------------------------------------------------------------------------------------------------------------------

Below steps demonstrates reading the data from JSON file using 'jsonfile' package.

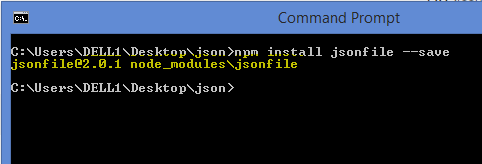
Import the 'jsonfile' package using the npm command 'npm install jsonfile --save'.
Note: if 'jsonfile' package is already installed, you can ignore this step(i.e. installing 'jsonfile' package).


File Name: BooksInfo.json
[
  {
    "book_id" : "1125",
    "book_name" : "Head First Java",
  "book_cost" : "620"
  },
  {
    "book_id" : "8876",
    "book_name" : "Node.js in Action",
  "book_cost" : "2097"
  },
  {
    "book_id" : "5484",
    "book_name" : "Angular JS Testing Cookbook",
  "book_cost" : "1519"
    }
]

File Name: PrintJsonData1.js
var jf = require('jsonfile')
var file = 'BookInfo.json'
jf.readFile(file, function(err, jsonData) {
  if (err) throw err;
  console.log("--------------Books Information --------");
  for (var i = 0; i < jsonData.length; ++i) {
    console.log("Book Id : "+jsonData[i].book_id);
    console.log("Book Name : "+jsonData[i].book_name);
    console.log("Book Cost : "+jsonData[i].book_cost);
    console.log("----------------------------------------");
  }

});

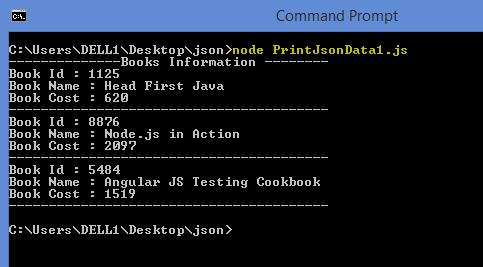
Type the command 'node PrintJsonData1.js' and press enter key.

--------------------------------------------------------------------------------------------------------------------------

Below steps demonstrates reading data from JSON file using 'jsonfile' package - 'readFileSync' function.

Import the 'jsonfile' package using the npm command 'npm install jsonfile --save'.
Note: if 'jsonfile' package is already installed, you can ignore this step(i.e. installing 'jsonfile' package).


File Name: BooksInfo.json
[
  {
    "book_id" : "1125",
    "book_name" : "Head First Java",
  "book_cost" : "620"
  },
  {
    "book_id" : "8876",
    "book_name" : "Node.js in Action",
  "book_cost" : "2097"
  },
  {
    "book_id" : "5484",
    "book_name" : "Angular JS Testing Cookbook",
  "book_cost" : "1519"
    }
]

File Name: PrintJsonDataSync.js
var jf = require('jsonfile')
var file = 'BookInfo.json'

var jsonData = jf.readFileSync(file);
for (var i = 0; i < jsonData.length; ++i) {
    console.log("Book Id : "+jsonData[i].book_id);
    console.log("Book Name : "+jsonData[i].book_name);
    console.log("Book Cost : "+jsonData[i].book_cost);
    console.log("----------------------------------------");
}

Type the command 'node PrintJsonDataSync.js' and press enter key.

Monday, 8 June 2015

Java and AutoIt - Automating the calculator application using autoitx4java

autoitx4java is useful for testing the Windows applications using the AutoIt.

For more information on 'autoitx4java' check the url https://code.google.com/p/autoitx4java/

1. Download 'AutoItX4Java.jar'.
https://code.google.com/p/autoitx4java/downloads/list

2. Copy the 'AutoItX4Java.jar' file to the 'lib' folder of the project(i.e. Eclipse IDE Project).

3. Download JACOB.


4. Extract the 'jacob-1.18-M2.zip' file.

5. Copy the below file in the 'lib' folder of the project.


7. Extract the 'autoit-v3.zip' file.

8. AutoIt Inspector - for inspecting the UI elements.


9.Set the java build path for 
- AutoItX4Java.jar
- jacob.jar


10. Create a java class.


11. Execute the program(Sample Program is added in the end of the page).

Note: Unable to execute the program, since AutoIt is not registered in the windows registry

Below steps guides you in adding AutoIt to the windows registry.
12. Open the 'CommandPrompt' as 'Administrator'


13. After extracting the 'autoit-v3.zip' file, navigate to the folder 'autoit-v3\install\AutoItX' in the extracted zip file.

Navigate to the 'autoit-v3\install\AutoItX'(i.e. extracted 'autoit-v3.zip') in the command prompt.

14. Add the 'AutoIt' to the registry.
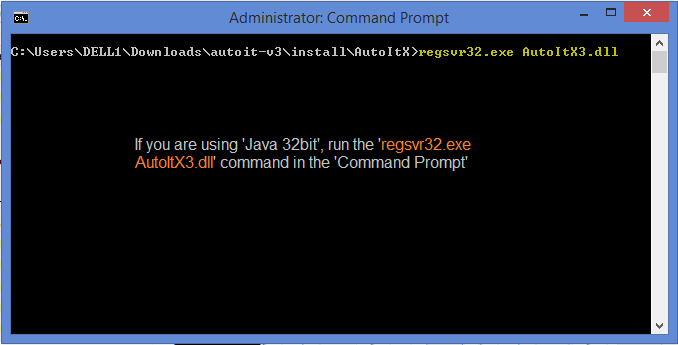
If you are using 'Java 32bit', run the below command in the 'Command Prompt':
regsvr32.exe AutoItX3.dll


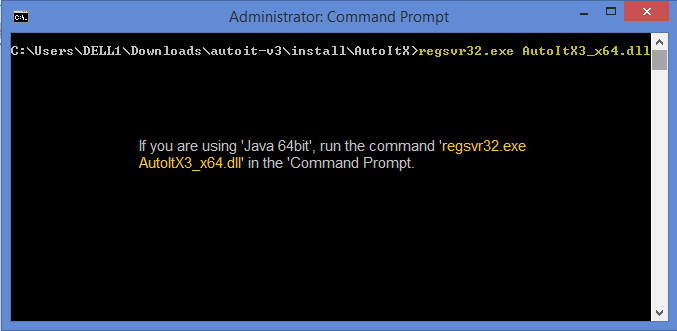
If you are using 'Java 64bit', run the below command in the 'Command Prompt':
regsvr32.exe AutoItX3_x64.dll


15.Execute the program again(Sample Program is added in the end of the page), after setting the AutoIt in windows registry.


you can download the below sample code from the repository, click link AutoIt Proj.zip to download.

Sample Program:
package autoit;

import java.io.File;
import java.util.HashMap;
import java.util.Map;

import autoitx4java.AutoItX;

import com.jacob.com.LibraryLoader;
public class CalculatorTest {
//Choose the 'JACOB' dll based on the JVM bit version.
final String JACOB_DLL_TO_USE = System.getProperty("sun.arch.data.model").contains("32") ?
 "jacob-1.18-M2-x86.dll" : "jacob-1.18-M2-x64.dll";

final String APPLICATION_TITLE = "Calculator";
final String APPLICATION = "calc.exe";
private AutoItX control;

private Map<Integer,String> calcNumPad_ObjectRepository;
private Map<String,String> calcOperPad_ObjectRepository;
{
//Object Repository for Calculator Numbers
calcNumPad_ObjectRepository = new HashMap<Integer,String>();
calcNumPad_ObjectRepository.put(0, "130");
calcNumPad_ObjectRepository.put(1, "131");
calcNumPad_ObjectRepository.put(2, "132");
calcNumPad_ObjectRepository.put(3, "133");
calcNumPad_ObjectRepository.put(4, "134");
calcNumPad_ObjectRepository.put(5, "135");
calcNumPad_ObjectRepository.put(6, "136");
calcNumPad_ObjectRepository.put(7, "137");
calcNumPad_ObjectRepository.put(8, "138");
calcNumPad_ObjectRepository.put(9, "139");

//Object Repository for Calculator Operators
calcOperPad_ObjectRepository = new HashMap<String,String>();
calcOperPad_ObjectRepository.put("+", "93");
calcOperPad_ObjectRepository.put("-", "94");
calcOperPad_ObjectRepository.put("*", "92");
calcOperPad_ObjectRepository.put("/", "91");
calcOperPad_ObjectRepository.put("=", "121");
calcOperPad_ObjectRepository.put("clear", "81");
//Load the jacob dll.
File file = new File(System.getProperty("user.dir")+"\\lib", JACOB_DLL_TO_USE);
System.setProperty(LibraryLoader.JACOB_DLL_PATH, file.getAbsolutePath());
control = new AutoItX();
}
public static void main(String[] args) throws InterruptedException {
CalculatorTest ct = new CalculatorTest();
//Launch 'Calculator' application.
ct.control.run("calc.exe");
ct.control.winActivate("Calculator");
ct.control.winWaitActive("Calculator");

//Perform Addition
System.out.println("Addition of 1,3 - Actual Results: "+ct.add(1,3)+",  Expected Results: 4");
System.out.println("Addition of 17,3 - Actual Results: "+ct.add(17,3)+",  Expected Results: 20");

//Perform Subtraction
System.out.println("Subtraction of 5,1 - Actual Results: "+ct.subtraction(5,1)+",  Expected Results: 4");
System.out.println("Subtraction of 90,7 - Actual Results: "+ct.subtraction(90,7)+",  Expected Results: 83");
//Perform Multiplication
System.out.println("Multiplication of 8,2 - Actual Results: "+ct.multiplication(8,2)+",  Expected Results: 16");
System.out.println("Multiplication of 15,4 - Actual Results: "+ct.multiplication(15,4)+",  Expected Results: 60");
//Perform Division
System.out.println("Division of 9,3 - Actual Results: "+ct.division(9,3)+",  Expected Results: 3");
System.out.println("Division of 100,2 - Actual Results: "+ct.division(100,2)+",  Expected Results: 50");
//Close 'Calculator' application.
ct.control.winClose("Calculator");
}
//Perform 'Addition'.
public int add(int a, int b) throws InterruptedException{
performOperation("clear");
clickNumber(a);
performOperation("+");
clickNumber(b);
performOperation("=");
return Integer.parseInt(getResults().trim());
}
//Perform 'Subtraction'.
public int subtraction(int a, int b) throws InterruptedException{
performOperation("clear");
clickNumber(a);
performOperation("-");
clickNumber(b);
performOperation("=");

return Integer.parseInt(getResults().trim());
}
//Perform 'Multiplication'.
public int multiplication(int a, int b) throws InterruptedException{
performOperation("clear");
clickNumber(a);
performOperation("*");
clickNumber(b);
performOperation("=");

return Integer.parseInt(getResults().trim());
}

//Perform 'Division'.
public int division(int a,int b) throws NumberFormatException, InterruptedException{
performOperation("clear");
clickNumber(a);
performOperation("/");
clickNumber(b);
performOperation("=");
return Integer.parseInt(getResults().trim());
}
//Fetch the results after performing the operations
private String getResults() throws InterruptedException{
Thread.sleep(1000);
return control.winGetText(APPLICATION_TITLE);
}
//Click the Number in the calculator application.
private void clickNumber(int number) throws InterruptedException{

String sNumber = String.valueOf(number);
for(int i = 0; i < sNumber.length(); i++) {
   control.controlClick(APPLICATION_TITLE, "", calcNumPad_ObjectRepository.get(Character.digit(sNumber.charAt(i), 10)));
   Thread.sleep(1000);
}
}
//Perform operations.
private void performOperation(String controlID) throws InterruptedException{
control.controlClick(APPLICATION_TITLE, "", calcOperPad_ObjectRepository.get(controlID));
Thread.sleep(1000);
}
}

Troubleshooting: 
Make sure you are using the correct version of Jacob and AutoItX3 dlls. Since both come in x86 and x64 versions.

Related Links

Automating Calculator application using Java and Sikuli.
http://automation-home.blogspot.in/2014/09/AutomateCalcAppWithJavaAndSikuli.html

Java and Twin Automation Tool - Automating windows calculator application.
http://automation-home.blogspot.in/2015/12/java-twin-automation-tool-automate-windows-calc-application.html