Wednesday, 28 December 2016

C# Visual Studio - SpecFlow Feature file

Prerequisite:
Configure SpecFlow in Visual Studio
https://automation-home.blogspot.com/2016/12/csharp-configuring-specflow-in-visualstudio.html

Create new project, ex: Console Application.
Select 'Solution Explorer -> <<Project>> -> Add -> New Item'

Select 'SpecFlow Feature File', give some name Ex: 'SampleFirstFeature' and click 'Add' button.

Perform 'Build'.

Build failed, since 2 references are missing.

'Add References' for missing references.
'References' > 'Manage NuGet Packages' > Search for SpecFlow.

Install 'SpecFlow'.

Simillarly install 'SpecFlow.NUnit'.

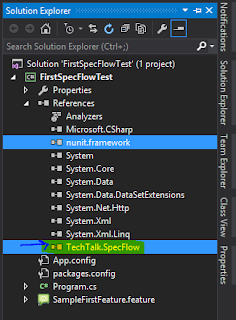
SpecFlow references are installed and added to the 'References'.

Now perform the 'Build' again.

Open 'Test Explorer'.
 Test Explorer is unable to show the tests in Test Explorer.

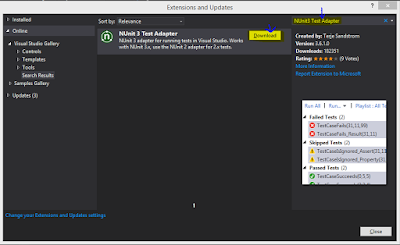
To view the tests in 'Test Explorer' install 'NUnit3 Test Adapter'.

Go to "Tools -> Extensions and Updates -> Online" and search for "NUnit3 Test Adapter" and then install.


Restart Visual Studio.


Close Test Explorer, perform Build and open the Test Explorer.

Run Selected Tests.
Displays structure of step definition methods. 

Wednesday, 21 December 2016

C# - Configuring SpecFlow in Visual Studio

Prerequisite:
Visual Studio is already installed
Download link for installing Visual Studio Community https://www.visualstudio.com/vs/community/

To Install & configure SpecFlow perform below steps in Visual Studio.

Select 'Tools -> Extension and Updates'

Click 'Online', search for 'SpecFlow'.

Click 'Download' button to download and install SpecFlow.

Once download is completed click 'Install' button.

Simillarly download and install 'Nunit Test Adapter'.

Restart Visual Studio

Select 'File -> New -> Project'

Search for SpecFlow, there is no project for Specflow

Where does the specflow resides?
 to know proceed with creating Console Application.
ex: Give name- FirstSpecFlowTest and click 'OK' button.

Console Application is created.

Select 'Solution Explorer -> <<Project>> -> Add -> New Item'

Three Items displayed
  • SpecFlow Feature File
  • SpecFlow Hooks
  • SpecFlow Step Definition  

Saturday, 17 December 2016

Restful Webservices - Manual Testing

Watch Demo


Prerequisite:
- Java
- Tomcat
- Chrome Extension : Advanced REST client
- JsonRestfulWebServicesCRUDExample.war

Set Path for JAVA_HOME
https://automation-home.blogspot.com/2016/08/java-8-installation-and-path-setting.html

Download tomcat and extract the zip file.
http://tomcat.apache.org/

Open the Chrome browser and download the Rest Client extension for Chrome- Advanced REST client
https://chrome.google.com/webstore/detail/advanced-rest-client/hgmloofddffdnphfgcellkdfbfbjeloo

Download the 'JsonRestfulWebServicesCRUDExample.war' from GitHub
https://github.com/automationhome/JsonRestfulWebServicesCRUDExample/tree/master/JsonRestfulWebServicesCRUDExample/target

Once all the above installations are done perform below steps
- Copy the 'JsonRestfulWebServicesCRUDExample.war' to webapps folder of tomcat
- Start tomcat server and verify services are running
- Open the browser and check tomcat server is started by accessing the url http://localhost:8080

Open the rest client extension(i.e. Advanced REST client) and access the rest webservices by using below methods(i.e. URL's)

Get Method:
To retrieve all products: http://localhost:8080/JsonRestfulWebServicesCRUDExample/products
To retrieve product by id: http://localhost:8080/JsonRestfulWebServicesCRUDExample/product/<<NUMBER>>

Delete Method: 
To delete the product: http://localhost:8080/JsonRestfulWebServicesCRUDExample/product/<<NUMBER>>

PUT Method:
Create the product: http://localhost:8080/JsonRestfulWebServicesCRUDExample/products/
{
"id": 5,
"productName": "Chair Shoe",
"price": 5.8
}

POST Method:
Update the product: http://localhost:8080/JsonRestfulWebServicesCRUDExample/products
{
"id" : 5,
"productName": "Chair Shoe",
"price": 4.8
}

Saturday, 12 November 2016

Maven installation and set path on Windows OS

Prerequisite:
Set path for Java, click below link for installing and set path for java on windows
https://automation-home.blogspot.in/2016/08/java-8-installation-and-path-setting.html

Follow below steps for installing and set path for maven 
Download maven from https://maven.apache.org/download.cgi

Click link 'apache-maven-3.3.9-bin.zip'.

Click 'OK' button to save the zip file.

zip file is downloaded.

Consider maven zip file is extracted at 'C:\Program Files\apache-maven-3.3.9-bin\apache-maven-3.3.9' 

 Open advanced system settings
Above screenshot is captured from Windows 8
Mouse right click on the start button and select 'System'.

 Click 'Advanced system settings'.

Select 'Advanced' tab and click on 'Environment Variables' button.

Add environment variable for maven.
Click 'New' button.


Add 'M2_HOME' or 'MAVEN_HOME' variables.
 Consider maven zip file is extracted at 'C:\Program Files\apache-maven-3.3.9-bin\apache-maven-3.3.9'
According to Maven documentation required only adding 'M2_HOME', but some programs still reference Maven folder with MAVEN_HOME, so it’s safer and better to add both.

Edit Path and add '%M2_HOME%\bin' to Path.

 Verify maven configuration by running the command 'mvn –version' in the command prompt.
 Mouse right click on the start button and select 'Command Prompt'.

Run the command 'mvn –version' in the command prompt.